[R1]ping 192.168.1.2 Ping 192.168.1.2 (192.168.1.2): 56 data bytes, press CTRL_C to break 56 bytes from 192.168.1.2: icmp_seq=0 ttl=255 time=1.000 ms 56 bytes from 192.168.1.2: icmp_seq=1 ttl=255 time=0.000 ms 56 bytes from 192.168.1.2: icmp_seq=2 ttl=255 time=0.000 ms 56 bytes from 192.168.1.2: icmp_seq=3 ttl=255 time=0.000 ms 56 bytes from 192.168.1.2: icmp_seq=4 ttl=255 time=0.000 ms
--- Ping statistics for 192.168.1.2 ---
5.开启Wireshark,查看抓取的Ping包内容
步骤1:点开HCL右侧边栏,右键点击GE0/0接口,并点击启动Wireshark,如图所示
步骤2:在Wireshark中可以看到抓到的数据包,紫色高亮的就是Ping包,如图所示
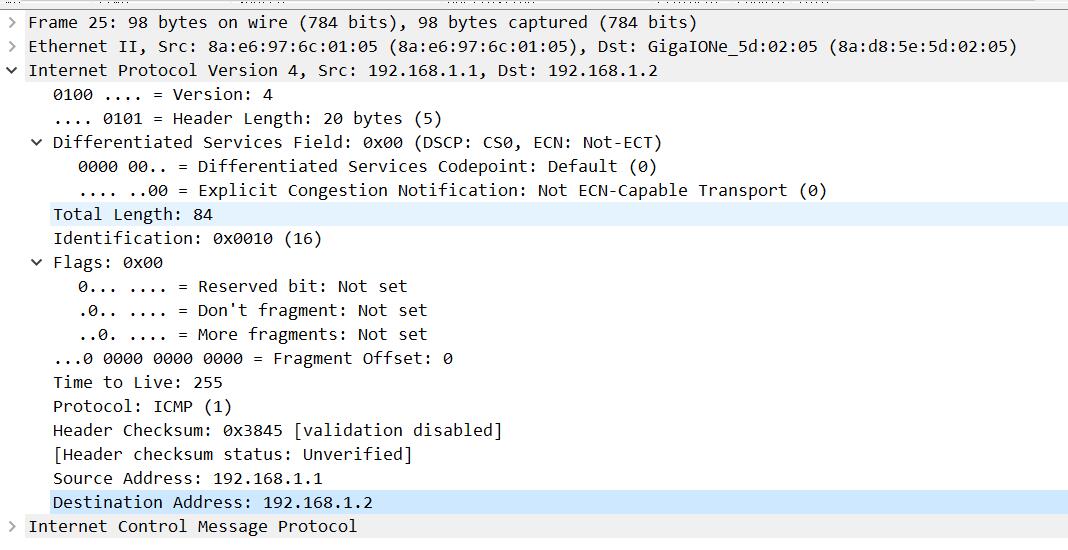
步骤3:双击某个Ping包,查看数据包详细内容,展开Internet Protocol Version 4,可以查看到详细的IP头部格式,如图所示
6.在R2上开启FTP服务,创建用户wangdaye,密码123456
1 2 3 4 5 6
[R2]ftp server enable [R2]local-user wangdaye class manage New local user added. [R2-luser-manage-wangdaye]password simple 123456 [R2-luser-manage-wangdaye]authorization-attribute user-role level-15 [R2-luser-manage-wangdaye]service-type ftp
7.在R1上访问FTP服务,输入用户名和密码
注意:FTP登录功能只能在用户视图下使用
1 2 3 4 5 6 7 8 9 10 11
<R1>ftp 192.168.1.2
Press CTRL+C to abort.
Connected to 192.168.1.2 (192.168.1.2).
220 FTP service ready.
User (192.168.1.2:(none)): wangdaye
331 Password required for wangdaye.
Password:
230 User logged in.
Remote system type is UNIX.
Using binary mode to transfer files.
ftp>